
Meta Title: How to Install a Rear Rack Pannier in 40 Seconds | OEM Step-by-Step Guide
Meta Description: Learn to install rear rack pannier bags on city bikes in 40 seconds. Our 12-year factory shares mounting tips, compatibility rules & custom OEM options for wholesale orders.
Tags: rear rack pannier installation, custom commuter pannier bags, bike pannier mounting systems
Introduction
Rear rack pannier bags are highly practical for daily commutes and grocery runs for urban riders — but a poorly mounted bag will wobble, rub against the wheel, or even slip off mid-ride, causing frustrating issues for end users.
What many riders do not know is that a standard quick-release pannier takes only 40 seconds to install correctly, and just 5 seconds to remove. Founded in 2014, our factory has 12 years of experience in custom bicycle pannier manufacturing, with over a dozen mounting designs including hook, quick-release, and strap-on systems. We have seen firsthand how poor mounting design leads to bulk after-sales problems.
This guide breaks down universal installation steps, compatibility rules, and common mistakes to avoid from an end-user perspective. For brand buyers, we also compare OEM mounting system options to help you reduce after-sales costs at the source.
Even if your pannier arrived without instructions, this universal guide works for both quick-release and strap-on models.
1. What You Need Before Installing a Rear Rack Pannier Bag
Confirming compatibility and preparing hardware ahead of time prevents “does not fit” returns — a critical detail for brand buyers to validate during product development.
1.1 Required Tools & Mounting Hardware
- Most quick-release panniers require no tools at all for installation; strap-on models only need a standard Allen key for adjustments.
- Standard included parts: top load-bearing hooks, lower catches / bottom straps, anti-slip rubber pads, and locking knobs.
1.2 Check Your City Bike Rear Rack Compatibility
- Rack type verification: standard eyelet racks, bikes without eyelets (use P-clamps to add a rack), or narrow racks for folding bikes.
- Fit boundaries: Standard 26–28 inch city bikes are universally compatible; small-wheel folding bikes may require narrow-spacing custom hooks.
Industry baseline: Most high-quality panniers are designed to fit mainstream standard rear racks. For OEM custom orders, prioritizing universal rack specifications lowers end-user fit barriers.
2. Step-by-Step Installation (Finish in 40 Seconds)
This method works for most standard quick-release rear rack panniers on the market.
2.1 Align & Lock the Top Mounting Hooks
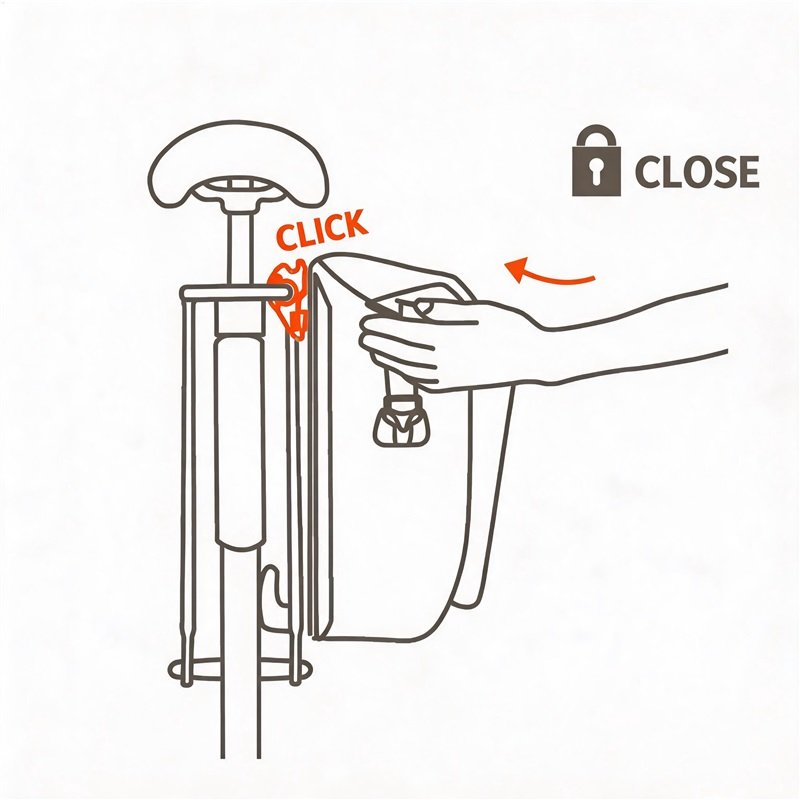
Position the two top hooks evenly over the rear rack’s top rail. Press down the quick-release buckles until you hear a clear click — this confirms the hooks are fully locked.
For square or oval rack tubes, double-check the lock position carefully, as non-round rails are more prone to false latching.
2.2 Secure the Lower Catch / Straps
- For models with a lower catch: Slide the catch behind the rack’s side rail.
- For strap models: Wrap the adjustable bottom straps around the rack’s vertical legs and pull tight. Tuck excess strap ends into storage slots to avoid catching in the wheel.
2.3 Do a Quick Security Check
Lift the bag gently to confirm it does not shift. Adjust the bag so its center of gravity sits low and close to the bike frame, to prevent heel rub or spoke contact while riding.
- Weight recommendation: We recommend a maximum load of 5kg (11 lbs) per side for standard city commuter racks, to preserve riding stability.
- Critical safety reminder: The lower guide hooks must lock facing forward (in the direction of travel) to prevent accidental release during hard braking.
2.4 Install the Rain Cover (For Waterproof Models)
Pull the included rain cover over the bag from top to bottom, and fasten the Velcro at the bottom. This stops rain from seeping through zipper gaps.
To learn more about waterproof fabrics and construction for panniers, read our guide on
the best weather-resistant materials for bike pannier bags.
2.5 How to Strap a Universal Duffel Pannier (No Mounting Hooks)
For universal strap-on bags without dedicated hooks, follow this method for a secure fit:
- Center the bag lengthwise on the rack platform, with the closure facing the rear to keep road spray out.
- Thread sturdy webbing straps through the bottom reinforced loops, crossing them under the rack for a locking effect. Pull snug — do not over-tighten to the point of distorting the bag or rack.
- Use built-in compression straps to cinch the entire bag and rack together, reducing side-to-side sway on turns.
- For long rides or gravel terrain: Add a secondary crisscross strap over the top of the bag for extra redundancy.
- Tuck all loose strap ends and buckles away from the spokes and drivetrain.
3. Extra Considerations for Safe Pannier Use
3.1 Rear Rack vs Front Rack: Which to Choose?
- Rear racks: The standard choice for commuting. They offer a low center of gravity and stable weight distribution for larger capacity bags.
- Front racks: Only recommended for bags under 20L. Heavy front loads negatively impact steering control and handling.
3.2 Packing & Weight Distribution Tips
- Place heavier items low and toward the inside of the bag, and keep weight even between left and right panniers.
- Use internal mesh pockets to organize contents and prevent shifting during rides.
- Weight reference: Standard city road bikes handle 10–14kg total cargo well; heavy-duty mountain bikes can support up to 25kg.
3.3 Size Matching Rules
- Folding / small-wheel bikes: We recommend 20–25L narrow panniers to avoid wheel rub.
- Standard city bikes: 25–35L regular-width panniers have the broadest universal fit.
- Cargo bikes: Support 40L+ large-capacity pannier designs.
4. Common Installation Mistakes to Avoid (Factory QC Summary)
Based on 12 years of quality control and after-sales data, these are the most frequent installation errors — brand buyers can design around them to cut return rates.
- Incompletely locked hooks: The top cause of pannier slipping on bumpy roads. Always confirm the click sound before riding.
- Loose excess strap ends: Can catch in the wheel and create safety hazards.
- High or off-center weight: Causes unstable handling and heel rub for riders.
- Overloading: Exceeds rack weight limits and leads to bent or broken parts.
- Loose hook fit on the rack tube: Constant vibration over time scratches rack paint and causes end-user complaints.
4.1 How to Prevent Chafing on Bike Racks & Frames
Due to normal road vibration, pannier contact points will gradually rub against rack paint over time — especially on rough surfaces. You can reduce this issue with three simple steps:
- Use correctly sized diameter reducers so QMR hooks fit tightly on the rack tube with no play.
- Align upper and lower guide hooks for even, balanced pressure.
- Add optional abrasion protection sleeves to the rack contact points.
5. Which Mounting System Is Best for Your Custom Pannier Line?
This is the core B2B section of this guide, helping brand buyers select the right mounting structure for their price point and target market.
| Mounting System | Key Features | Best For | OEM Value |
|---|---|---|---|
| Hook Type Mounting | Simple structure, low cost, fits most standard racks | Budget entry-level, basic city panniers | Ideal for startup brands with low MOQ; short production lead time |
| Quick-Release Center Lock | One-click lock & release, tool-free, strong stability | Mid-range commuter & grocery panniers | Most popular in EU/US markets; high user acceptance, low after-sales |
| QMR (Quick Mount Release) | Adjustable upper/lower rails, diameter reducers fit 8–16mm round/square/oval tubes; integrated lock holes compatible with TSA padlocks | Mid-to-premium commuter & urban business panniers | Fits 90%+ city bike racks; drastically reduces “does not fit” complaints |
| Strap-On Universal Mounting | Universal fit for all bike types, no dedicated rack required, fully adjustable | Folding bikes, small-wheel bikes, bikes without rack holes | Maximum compatibility; best for niche scenario product lines |
For a deeper comparison of mounting structures, read our full guide to
different types of pannier bag mounting systems.
Explore our full product line of
custom waterproof rear rack pannier bags for wholesale OEM orders.
All our mounting systems undergo durability testing aligned with international hardware quality standards from
ASTM International.
6. Pro Tips for Long-Lasting Mounting Performance
- Check hook screw tightness regularly, and always do a quick check before long rides.
- Replace worn anti-slip rubber pads promptly to avoid scratching rack paint.
- Wipe metal buckles dry after rainy rides to prevent rust from seizing the quick-release mechanism.
- Remove panniers for long-term storage to avoid permanent bending of hooks under constant load.
- Keep a spare strap in your toolkit for on-trail adjustments — vibration can loosen straps over long distances.
Conclusion
Installing a rear rack pannier on a city bike is straightforward — standard quick-release models take only 40 seconds when done correctly. The key is selecting a compatible mounting system, following proper locking steps, and verifying stability before riding.
For brand buyers, mounting system design directly impacts end-user satisfaction and after-sales costs. For most commuter pannier lines, the quick-release center lock system offers the best balance of cost, usability, and reliability. For premium lines, the QMR system’s universal fit and anti-theft features deliver strong upsell value.
If you are developing a custom commuter pannier line, we can provide samples of different mounting systems for fit and durability testing.
OEM Sample Service: Need custom pannier bags with your choice of mounting system? Contact us for free samples and a wholesale OEM quote. Our sample lead time is 3–7 working days, with full customization for logos, fabrics, sizes, and hardware.
Frequently Asked Questions
